How to use Packer and automate creation of Ubuntu template on Vmware
Packer ? Again a new amazing tool for Devops
![]()
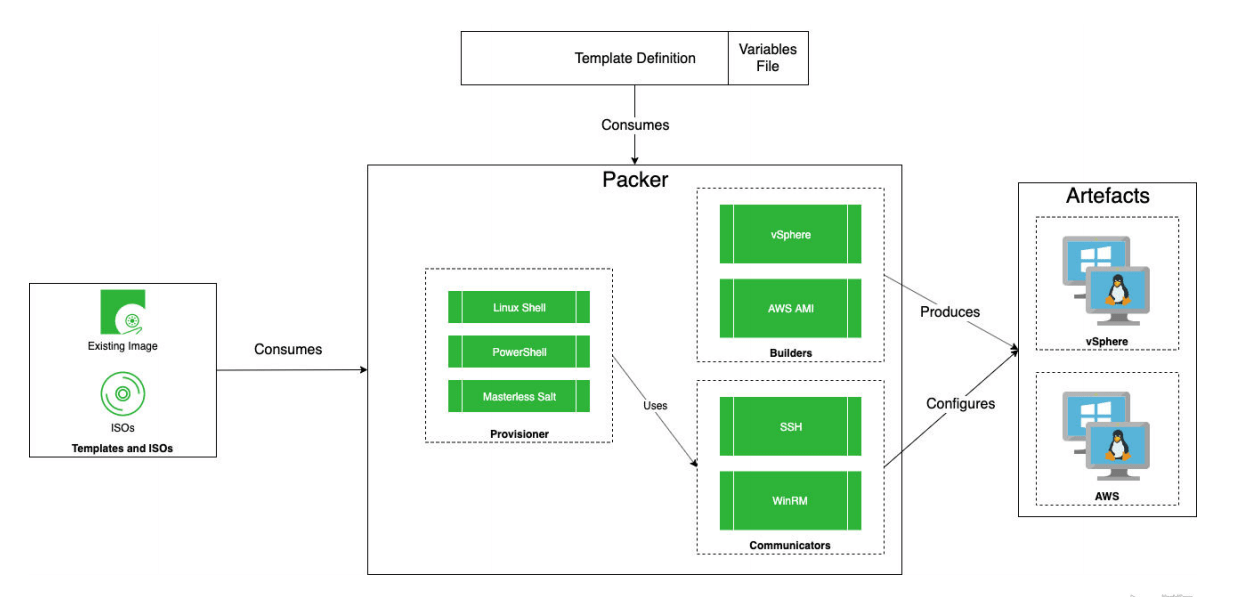
packer is a wonderful tool to automate the creation of any type of AMI or template.
You can easily build image for Vmware, Azure, Aws, Docker, and so on. You can see all the builders available there https://www.packer.io/docs/builders.
This one will be responsible to build the image from an ISO and a json or HCL2 Configuration file. Templates are JSON files which define one or more builds by configuring the various components of Packer. Packer is able to read a template and use that information to create multiple machine images in parallel.
Basically, with only one JSON configuration file, you will be able to build templates for multiples platforms.
As it’s infrastructure as a code and all the configuration is file based, you will be able to:
- Use version control like git to give us the possibility to rollback to any previous version of the image.
- Automate the process of building images with the CI/CD pipeline associate with your version control tool.
You can combine packer with a lot of provisioners like Ansible, powershell, shell to configure the image after booting and coupling with terraform to go one step further in term of automation and deploy one or multiple instance based on this new image build with Packer to Aws,Vmware,Azure,…
**Amazing, right ? ** ❤️
Main Use Cases: – Building Appliances – Base Templates – Development and Production Parity – Continuous Delivery
Advantages of using Packer
- Fast Infrastructure Deployment : Packer coupled with tools like Ansible and Terraform will allow you to launch completely provisioned and configured machine in seconds.
- Multiple provider/builder and portability: Packer will create identical images for multiples platforms, you can run by example QA/Testing on Cloud like AWS, Azure and production in a private cloud like OpenStack or Vmware and each environment will run an identical machine image, giving ultimate portability
- Improved Stability : Packer will install and configure all the software and dependency at the time the image is built and so, any bugs or errors will be caught early.
- Greater testability : Once the image is build, the image can be smoke tested to verify that all is working before to be deployed on production environment
Installation
For our example, we will use a linux server (Ubuntu).
First download the package directly on this URL : https://www.packer.io/downloads and copy it on your server or copy the link address and use curl.
curl --remote-name https://releases.hashicorp.com/packer/1.6.1/packer_1.6.1_linux_amd64.zip
Unzip the file and put the file on a directory of your PATH environment, if you do not know, use this command :
echo $PATH
Unzip on the BIN Directory by example :
unzip packer* -d /usr/local/bin
Verification
After installing Packer, verify the installation worked by opening a new command prompt or console, and checking that packer is available
root@mt-ub-terform:/usr/local# packer --version
1.6.1
That’s it ! You are ready to use packer and build your first image.
Build your first image for Vmware
Packer uses JSON template files to describe the configuration needed to build any images. We will do our first configuration file and build our first image.
To validate your json file, use json.tool provide by python as below :
python -m json.tool variables/variable.json
It will provide you details about the error in case of any bad json formatting, it can be very useful !
To automatize the creation of templates in VMware vSphere ESX, there are 2 different ways :
-
Use the VMware-iso provider Supports building virtual machines on hosts running VMware Fusion for OS X, VMware Workstation for Linux & Windows, and VMware Player on Linux. It can also build machines directly on VMware vSphere Hypervisor using SSH as opposed to the vSphere API. As we are using Vcenter 6.7, we can use directly the Vsphere API.
-
Use the vSphere-iso provider Builds VMs on VMware vSphere directly using vSphere API. We will chose this option.
You can check if you can use the Vsphere API using this URL : ‘https://vcenterhostname/apiexplorer/’
In this case, we will make a virtual machine template for ubuntu 18.04.
Source: Vsphere ISO Packer
Requirements
- Packer
- Ubuntu 18.04 ISO Ubuntu 18.04 release
- Vcenter 6.5 minimum for using all the feature of the REST API
Packer File organisation
There are 3 files in our example to deploy an ubuntu 18.04 template with packer
- The Packer Template - packer_ubuntu18.json Specify the builder and the provisioner and all the process to create the template
- The variable file variable.json containing all information/variables to connect to Vcenter and the specification of the template ( Datastore, Cpu, Memory, …) We will be able to use this file for other template deployment, this is the beauty of IAC 😄
- The PreConfig file is a preseed file - preseed_ubuntu18.cfg . It will answer automatically to question during the installation process. Amazing ? right ? Packer needs the preseed file to handle any questions that would normally be answered interactively during a Linux installation.
Notes:
Preseeding provides a way to set answers to questions asked during the installation process, without having to manually enter the answers while the installation is running. This makes it possible to fully automate most types of installation and even offers some features not available during normal installations. Ubuntu Preseeding
The structure of the file organization will be as below :
 ├── packer
    ├── files
    ├── Iso
    │   └── ubuntu-18.04.4-server-amd64.iso
    ├── packer_cache
    │   └── 23ac40ee61da5cc4ecaa017cd6d33a162365c3ac.iso.lock
    ├── variable
        └── variable_prod.json
    ├── scripts
        └── preseed_ubuntu18.cfg
    ├── templates
        └── packer_ubuntu18.json
1. The Variables file - variable_prod.json
On this file, we will put all variable need to connect to Vmware Vcenter and deploy the template.
We are using a separate file to keep higher level of automation and as well because there is password on it and the script will be encrypt later, we can use another file to deploy on another vcenter or with different ISO. Again, this is the beauty of IAC.
{
 "vm-name": "tmpl-ub-18-server-infra",
 "vcenter-server": "mt-sles-vcint01.mtx.vodafonemalta.com",
 "vcenter-username": "administrator@vsphere.local",
 "vcenter-password": "superMegaPassword",
 "datacenter": "MTX01",
 "cluster": "DMZVI",
 "datastore": "109-PRODVI-NIX",
 "datastoreiso": "2-ISOVI-3P1FC-L2",
 "folder": "Templates",
 "folderiso": "Ubuntu",
 "notes": "Team: VIBS\n Importance: Medium\n Purpose: Ubuntu 18 Template",
 "network": "vi_management",
 "http_proxy_user": "https://10.74.208.11:8080",
 "https_proxy": "https://10.74.208.11:8080",
 "disable_ipv6": "true",
 "iptemplate": "192.168.120.142",

 "vm-cpu-num": "2",
 "vm-mem-size": "2048",
 "vm-disk-size": "10240",

 "ssh-username": "SupersshUser",
 "ssh-password": "SuperUserShhPasswordYouWillNotKnow",
 "ssh-key": "/home/vibs/.ssh/id_rsa.pub",

 "iso_url": "Iso/ubuntu-18.04.4-server-amd64.iso",
 "iso-checksum": "e2ecdace33c939527cbc9e8d23576381c493b071107207d2040af72595f8990b",
 "iso-checksum-type": "sha256"
}
For the checksum of the ISO, read the file SHA256SUM and use the code for the ISO you download.
2. The preseed - preseed_ubuntu18.cfg
This file will automatically install the OS. The preseed depend on the OS and the release. This is a typical preseed for Debian base image but unhappily from Ubuntu20 will not be available anymore as they will use subiquity, the new automated installer for Ubuntu/Debian Servers.
Don’t worry, subiquity is cleaner and easier as it’s human readable syntax ( YAML ).
Basically, i will configure the basic during the preseed and add the user and proxy to be able to update the package and configure the server with ansible once it’s installed
As you can see, i’m using the encrypted password for my superuser, you can get them from the file /etc/shadow
### Base system installation
d-i base-installer/kernel/override-image string linux-server
# Setting the locales, country
# Supported locales available in /usr/share/i18n/SUPPORTED
d-i debian-installer/language string en_GB
d-i debian-installer/country string MT
d-i debian-installer/locale string en_GB.UTF-8
# Keyboard setting
d-i console-setup/ask_detect boolean false
d-i keyboard-configuration/layoutcode string gb
d-i keyboard-configuration/modelcode string pc105
# for fucling proxy
choose-mirror-bin mirror/http/proxy string http://10.74.208.11:8080

# Network setting
d-i netcfg/enable boolean true
d-i /choose_interface select auto
# If you prefer to configure the network manually, uncomment this line and
# the static network configuration below.
d-i netcfg/disable_autoconfig boolean true
d-i netcfg/get_ipaddress string 192.168.120.142
d-i netcfg/get_netmask string 255.255.255.0
d-i netcfg/get_gateway string 192.168.120.254
d-i netcfg/get_nameservers string 192.168.22.4
d-i netcfg/confirm_static boolean true

# APT
d-i mirror/protocol string http
d-i mirror/country string manual
d-i mirror/http/hostname string it-mirrors.evowise.com
d-i mirror/http/directory string /ubuntu
d-i mirror/http/proxy string http://10.74.208.11:8080

### Partitioning
d-i partman-auto/method string lvm
d-i partman-lvm/confirm_nooverwrite boolean true
d-i partman-auto-lvm/guided_size string max
d-i partman/choose_partition select finish
d-i partman/confirm_nooverwrite boolean true

# Any hostname and domain names assigned from dhcp take precedence over
# values set here. However, setting the values still prevents the questions
# from being shown, even if values come from dhcp.
d-i netcfg/get_hostname string tmpl-ub18-server-infra
d-i netcfg/get_domain string mtx.vodafone.com

# To pick a particular interface instead:
#d-i netcfg/choose_interface select eth1

# User creation superuser
d-i passwd/user-fullname string superuser
d-i passwd/username string superuser
d-i passwd/user-password-crypted password $6$iMyr.4vu$aHIeLFvVOug/eMAng5N4k0MjqCxSlNloMpyZH9Gut.hpDFI/s3FStDEfrerferfrefdQPOc.
d-i user-setup/allow-password-weak boolean true

# Set root password
d-i passwd/root-login boolean true
# From /etc/shadow
d-i passwd/root-password-crypted password $6$GW8Qcjc4$PTVuAmEAfrgrdeZEhMCW6Fgpo0jfVTVYWCVJzOwfxw/H4CS8lc5mzbi/iQUn..
# enable shadow passwords
d-i passwd/shadow boolean true

### Package selection
tasksel tasksel/first standard
d-i pkgsel/include string openssh-server build-essential sudo
d-i pkgsel/install-language-support boolean false

# disable automatic package updates
d-i pkgsel/update-policy select none
d-i pkgsel/upgrade select full-upgrade

# Package installations
d-i grub-installer/only_debian boolean true
d-i preseed/late_command string \
    echo 'vibs  ALL=NOPASSWD: ALL' > /target/etc/sudoers.d/vibs ; \
    adduser vibs sudo ; \
    in-target chmod 440 /etc/sudoers.d/vibs ; \
    apt-install open-vm-tools python python-apt
d-i cdrom-detect/eject boolean true
d-i finish-install/reboot_in_progress note
NB: I changed of course the password and the user 😄
3. The Builder file
This file is the foundation of Packer.
You will specify the spec of your virtual machine or image following the builder that you chose (Vmware, AWS, Docker, …), the ISO, the preseed and then the provisioner and the post processes.
On this example, i didn’t use post processes as i’m making a template and all the post configuration is done by script and Ansible ( remote Ansible ) .
Then, when the virtual machine will be done, the OS will be Post configured by Ansible.
{
  "builders": [
    {
      "CPUs": "{{user `vm-cpu-num`}}",
      "RAM": "{{user `vm-mem-size`}}",
      "boot_wait": "10s",
      "boot_command": [
        "<enter><wait><f6><wait><esc><wait>",
        "<bs><bs><bs><bs><bs><bs><bs><bs><bs><bs>",
        "<bs><bs><bs><bs><bs><bs><bs><bs><bs><bs>",
        "<bs><bs><bs><bs><bs><bs><bs><bs><bs><bs>",
        "<bs><bs><bs><bs><bs><bs><bs><bs><bs><bs>",
        "<bs><bs><bs><bs><bs><bs><bs><bs><bs><bs>",
        "<bs><bs><bs><bs><bs><bs><bs><bs><bs><bs>",
        "<bs><bs><bs><bs><bs><bs><bs><bs><bs><bs>",
        "<bs><bs><bs><bs><bs><bs><bs><bs><bs><bs>",
        "<bs><bs><bs>",
        "/install/vmlinuz",
        " initrd=/install/initrd.gz",
        " priority=critical",
        " locale=en_GB",
        " file=/media/preseed_ubuntu18.cfg",
        "<enter>"
      ],
      "boot_order": "disk,cdrom",
      "cluster": "{{user `cluster`}}",
      "convert_to_template": "true",
      "datacenter": "{{user `datacenter`}}",
      "datastore": "{{user `datastore`}}",
      "floppy_files": [
        "./scripts/preseed_ubuntu18.cfg"
      ],
      "folder": "{{user `folder`}}",
      "guest_os_type": "ubuntu64Guest",
      "host": "{{user `host`}}",
      "insecure_connection": "true",
      "iso_checksum": "{{user `iso-checksum-type`}}:{{user `iso-checksum`}}",
      "iso_urls": "{{user `iso_url`}}",
      "network_adapters": [
        {
          "network": "{{user `network`}}",
          "network_card": "vmxnet3"
        }
      ],
      "password": "{{user `vcenter-password`}}",
      "ssh_username": "{{user `ssh-username`}}",
      "ssh_password": "{{user `ssh-password`}}",
      "ssh_certificate_file": "{{user `ssh-key`}}",
      "storage": [
        {
          "disk_size": "{{user `vm-disk-size`}}",
          "disk_thin_provisioned": true
        }
      ],
      "type": "vsphere-iso",
      "username": "{{user `vcenter-username`}}",
      "vcenter_server": "{{user `vcenter-server`}}",
      "vm_name": "{{user `vm-name`}}"
    }
  ],
  "provisioners": [
    {
      "destination": "/tmp/PostInstall.sh",
      "source": "./files/PostInstall.sh",
      "type": "file"
    },
    {
      "destination": "/tmp/motd",
      "source": "./files/logo.txt",
      "type": "file"
    },
    {
      "playbook_file": "../ansible/post_template_install.yml",
      "extra_arguments": ["-e", "ansible_python_interpreter=/usr/bin/python", "-vvvvvv"],
      "type": "ansible"
    }
]
}
boot_command section is very important. It’s the keyboard touch use for load the Preseed and it will different follow the OS and version you are using.
After the Image is built, it will use Ansible ( installed on the same server than packer ) to configure all the template.
![]()
The Ansible playbook is as below :
---
- name: 'Post update and install of new linux template'
  hosts: all
  become: yes
  become_user: root
  gather_facts: true # need to get os version

  roles:
    - role: template-linux-install
The role ‘Template-linux-install’ will play different tasks and install different package follow the OS
root@mt-ub-terform:/etc/ansible/roles/template-linux-install/tasks# cat main.yml
---
# main tasks file for template-linux-install

- include: ubuntu16-setup.yml
  when: ansible_distribution == "Ubuntu" and ansible_distribution_major_version == "16"
- include: ubuntu18-setup.yml
  when: ansible_distribution == "Ubuntu" and ansible_distribution_major_version == "18"
- include: ubuntu20-setup.yml
  when: ansible_distribution == "Ubuntu" and ansible_distribution_major_version == "20"
Basically, this role will install few packages and configure my virtual machine but this explanation will be part on the second part of ths article.
In this case, each time i need to update or add any configuration, i will change the ansible script and launch the command again to deploy my template.
I can even put in a pipeline to automate the process to build my image once i commit my new code.
Wow! all right, this is Infrastructure of code and part of Continuous Delivery ! What to say except, I Love it ❤️ !
It’s nice but… What to do now ? How to build this template with packer now !?
Easy, just one command, you specify the template and the variable files and packer will do the job.
packer build -var-file variables/variable_prod.json templates/packer_ubuntu18_new.json
Easy ? right ?
As you can see, i’m using the parameter -var-file to select the configuration file used for the building of the ISO.
Then, it will make easy to use other variable’s file to deploy on another Vmware environment.
Debugging Packer Builds
This section was quite important for me when i started with packer and i think it’s always best practice to know how to troubleshoot and analyse any issues for anything in IT.
Validate Syntax of Json Packer Configuration file
packer validate -syntax-only -var-file=variables/variable.json templates/packer_ubuntu18_new.json
You can use as well python to validate the json of the variable
python -m json.tool variables/variable.json
Enabling logging for Packer
Packer depends on two environment variables being configured. These two variables are PACKER_LOG and PACKER_LOG_PATH, both need to be configured our no logging will occur
export PACKER_LOG=1
export PACKER_LOG_PATH="/var/log/packer.log"
⚠️ This change is not permanent and only temporary.
You can eventually use the Variable when you launch the command to see the log on the console :
PACKER_LOG=1 packer build -i <var.json> <config.json>
Choose action once there is any error
Using packer build -on-error=ask allows you to inspect failures and try out
packer build -on-error=ask -var-file variables/variable_prod_ub20.json templates/packer_ubuntu20.json
Debugging on Vmware
For debugging on Vmware, the first step is to see if the VM is created temporary and if the CDROM/iso and the floppy are connected.
You can connect to the console of the vm and check what is happening during the installation
If any issue, analyse the logs /var/log/syslog and the directory /var/log/installer on the console.