First step with Ansible - Prepare your environment and start to play with Ansible
This first article about Ansible will help you understand what is the purpose and how to start with this amazing automation tools which is Ansible ! A long time ago, … Ansible was born and change the life of IT and Devops.
Ansible - What is it and why it is so powerful ?
Ansible is like the Swiss knife for Devops in term of Configuration Management and it’s a must have to know and to use when you need to manage hundreds or thousands of VMs or servers.
![]()
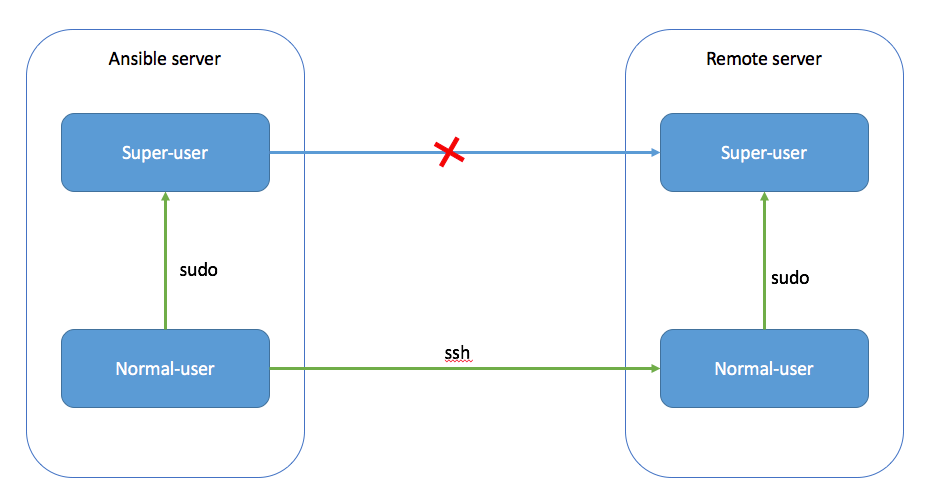
Ansible is an agentless automation tools, meaning that you don’t need to install anything on each server you will manage as Ansible will connect using the SSH protocol ( port TCP 22 ) and you will be able to manage all or few of your servers ( managed nodes ) from that central point, the control node,‘the Master’ .

Good to know as well that Ansible is a push configuration management tools as the master ( or the main server ) pushes the configuration to the node and not the opposite as chef or puppet which are pulling configuration management tools.
As I don’t like to make few times the same boring thing, I always try to AUTOMATE each process and Ansible is definitively the tool for that as it’s very powerful for a lot of automation workflow.
You can use it to manage Windows machines, Linux, Vmware, Hpe product, etc.
Ansible is shipped with a lot of amazing modules which has specific use from the administration of users on the system to the configuration of network devices.
Installation of Ansible on Ubuntu
You will only need to install ansible on your control nodes. In this example, we will install Ansible on Ubuntu but you can follow this documentation follow your OS Ansible Installation
$ sudo apt update
$ sudo apt install software-properties-common
$ sudo apt-add-repository --yes --update ppa:ansible/ansible
$ sudo apt install ansible
Once installed, verify :
# Get version of Ansible
ansible --version
# Get Facts of the Control Host
ansible localhost -m setup
Ansible node Inventory
Ansible is using simple INI or YAML file to organize the inventory of the nodes you will manage.
There is few different way to organize follow your needs, it can be by example by
- importance ( Test, PreProd, Prod, Lab)
- os ( Linux, Windows, …)
- purpose ( web, database, …)
You can use different inventory file and specify it when you are using ansible with the -i parameter. And you can specify the -i switch more than once time to use multiple inventories. It’s very useful in case you are using dynamic inventories as Ansible will combine Static and dynamic inventories together. This part will be explained further in other post.
INI Configuration file example
In our case, we will separate by OS Distribution.
The headings in brackets are group names, which are used in classifying hosts and deciding what hosts you are controlling at what times and for what purpose, in this case we are classifying by Linux distribution.
vim /etc/ansible/inventory/serverlinux.cfg
sudo -i
[ubuntu]
mt-ub-graf1
mt-ub-postfix
mt-ub-syslog1
mt-ub-teleg1
mt-ub-repo1

[centos]
mt-ce-medcre6
mt-ce-medcre7
mt-ce-stor2rrd

[oracle]
mt-ol-dpis
mt-ol7-repo1
mt-ol6-repo1

[repo]
mt-ub-repo1
mt-ol6-repo1
I’m not using YAML file for the Ansible inventory as I try to keep simple and as we don’t have thousand of servers, I find it more readable.
There are 2 groups by defaults :
[all] and [ungrouped]. Basically, the all is all 😄.
It contains all the hosts from each group/section.
The ungrouped will be all the hosts which are not part of any group. We don’t have any in this case.
You can have a overview/tree of your inventory with this ansible command :
$ ansible-inventory --graph -i serverlinux.cfg
@all:
  |--@centos:
  |  |--mt-ce-medcre6
  |  |--mt-ce-medcre7
  |  |--mt-ce-stor2rrd
  |  |--mt-ce7-repo1
  |--@oracle:
  |  |--mt-ol-dpis
  |  |--mt-ol6-repo1
  |  |--mt-ol7-repo1
  |--@repo:
  |  |--mt-ce7-repo1
  |  |--mt-ol6-repo1
  |  |--mt-ol7-repo1
  |  |--mt-ub-repo1
  |--@ubuntu:
  |  |--mt-ub-graf1
  |  |--mt-ub-postfix
  |  |--mt-ub-repo1
  |  |--mt-ub-syslog1
  |  |--mt-ub-teleg1
  |--@ungrouped:
You can organize each host in one or more groups, it can be very useful.
Then, you can target specific group or specific host and you can specify the inventory file that you want to used.
$ ansible repo -i inventory/serverlinux.cfg -m ping
mt-ub-repo1 | SUCCESS => {
    "ansible_facts": {
        "discovered_interpreter_python": "/usr/bin/python"
    },
    "changed": false,
    "ping": "pong"
}
As you see, I’m using specific user ‘ansibleadmin’. Let’s see how to configure ansible to be able to connect on each node without password.
if you don’t want to specify each time your inventory file, you can configure the ansible variable : ANSIBLE_INVENTORY
export ANSIBLE_INVENTORY=/etc/ansible/inventory/serverlinux.cfg
This change will not be permanent and will be remove once you close your session.
If you want to keep it permanently, you will need to change your Ansible configuration file as below:
vim /etc/ansible/ansible.cfg
inventory      = /etc/ansible/inventory/serverlinux.cfg
SSH Keys are your best friend !

As you don’t want to type your password each time you will manage the same servers, SSH key shared between your Ansible and the Servers Managed will be your best option.
SSH keys can allow you to connect to a server, or multiple servers, without having to remember or enter your password for each system.
You can use Root user but it’s not recommended, used another user and become sudo from ansible.
First of all, you will need to create this user on Ansible and create a new SSH key that you will share with the host that you want to manage.
Create new User on Ansible and nodes
From Ansible - Master :
if Ubuntu/Debian :
- Create the user and add the sudo permission
adduser ansibleadmin
adduser ansibleadmin sudo
If you have any error message like :
bash: sudo: command not found
You need to install sudo 😄
apt-get install sudo
- Create a new authentication ssh key for the user ansibleadmin
su - ansibleadmin
ssh-keygen -t rsa -b 4096
As you can see, i’m using rsa public key algorithms ( use by default), it’s not the best but it’s compatible with almost all old version of OpenSsh servers and it’s safe enough but it’s recommended to use 4096 bits key size ( -b 4096 ) .
If your servers have all minimum version of OpenSSH version 6.5, you can change algorithm to Ed25519, which is faster and better.
It’s the most recommended public-key algorithm available today but unhappily I have OS with old OpenSSh Version to manage for which I cannot upgrade OpenSSH. If you want to use this algorithm, use the command below ( of course change the -C parameter with your email )
ssh-keygen -a 100 -t ed25519 -f ~/.ssh/id_ed25519 -C "julien.simon@vodafone.com"
From Host you want to manage :
- Repeat the first step to create the user on the node and change sudoers file to let user to sudo without password prompting.
If Ubuntu/debian :
adduser ansibleadmin
adduser ansibleadmin sudo
vim /etc/sudoers

#Add or change this line as below :

%sudo ALL=(ALL) NOPASSWD: ALL
If Centos/Oracle Linux :
useradd ansibleadmin -G wheel
passwd ansibleadmin

vim /etc/sudoers

#Add or uncomment this line :

%wheel  ALL=(ALL)       NOPASSWD: ALL
⚠️ Once, the change done on the sudoers file, all users from group sudo or wheel will be able to sudo without password prompting. If you don’t want do it just for your user ‘ansibleadmin’ instead without the char ‘%’ as it’s for group only.
Copy the ssh key from Ansible to different nodes
Once the key is done from Ansible, you need to copy it to each node to be able to connect to them without password prompting.
From Ansible
su - ansibleadmin
ssh-copy-id servername
ex :

ssh-copy-id mt-ub-postfix
As we don’t want to do it for all the server one by one, we can automate the process using bash :
for server in $(grep -v '\[' inventory/serverlinux.cfg | sort --unique) ; do ssh-copy-id $server ;done
Once the ssh key is copied, try to connect by ssh on all servers :
for server in $(grep -v '\[' inventory/serverlinux.cfg | sort --unique) ; do timeout 5s ssh $server ; done
As you can see, i’m using the timeout command to close the SSH session after 5s and pass to the next one after.
And…That’s it for the pre configuration !

🆘 If you don’t want to use ssh key, you can use password using these parameters :
-u,--user REMOTE_USER # Connect as this user
-k,--ask-pass # ask for connection password
-b,--become # to sudo, become root
-K, --ask-become-pass # to prompt for root password

ansible groupname -m ping -u remoteuser -k -K
💡 You can define in your inventory the remote user to be used for one host or one group of host
[repo]
mt-ub-repo1
mt-ol6-repo1

[repo:vars]
ansible_user=superuser

[test]
mt-ce-test01 ansible_host=192.168.100.100 ansible_user=superman
Let’s now play with Ansible using our first ad-hoc command.
Ansible AdHoc command
If you want to do simple task on all your servers, you can use directly the Ad hoc command of Ansible with the different module provided. Ad Hoc will execute one-off commands and will not keep any record of what was done.
It’s really easy to use once you will understand the different parameter and start to know the different module. For these reasons, Ad hoc command will only be used for small changes quickly or troubleshooting fast or for learning Ansible and its modules.
For more complexes and bigger task, Ansible playbooks will be used and it will give you the possibility to reuse and organize your tasks easily. Moreover, you will keep them organized and have a copy on them and you will be able to use them again easily.
This part will be explained in the next article 😄
Let’s focus on Ad hoc Command from now, the syntax is as below :
ansible parameter1[all|ungrouped|group|hostname] (-i inventoryfile) -m moduleName -a ModuleArguments --become(to sudo) -l(limit by tag or hostname)
ex:
$ ansible repo -i serverlinux.cfg -m ping
mt-ub-repo1 | SUCCESS => {
    "ansible_facts": {
        "discovered_interpreter_python": "/usr/bin/python"
    },
    "changed": false,
    "ping": "pong"
}
mt-ol6-repo1 | SUCCESS => {
    "ansible_facts": {
        "discovered_interpreter_python": "/usr/bin/python"
    },
    "changed": false,
    "ping": "pong"
}
As my group/section on my inventory is as below :
[repo]
mt-ub-repo1
mt-ol6-repo1
You can limit to only one hostname as well using the -l parameter
$ ansible all -i serverlinux.cfg -m ping -l mt-ub-repo1
mt-ub-repo1 | SUCCESS => {
    "ansible_facts": {
        "discovered_interpreter_python": "/usr/bin/python"
    },
    "changed": false,
    "ping": "pong"
}
Ansible has a lot of Ad hoc commands useful :
You can get the fact of the host like the distribution, the ip address, dns, etc with the module gather_fact or setup and you can filter follow what you want.
$ ansible mt-ce-medcre7 -m gather_facts -a 'filter=ansible_all_ipv4_addresses'
mt-ce-medcre7 | SUCCESS => {
    "ansible_facts": {
        "ansible_all_ipv4_addresses": [
            "192.168.120.107",
            "192.168.122.1"
        ],
        "discovered_interpreter_python": "/usr/bin/python"
    },
    "changed": false,
    "deprecations": [],
    "warnings": []
}
You can get a lot of information about your servers you are managing and it can save you a lot of time.
$ ansible repo -m setup -a 'filter=ansible_distribution'
$ ansible repo -m setup -a 'filter=ansible_dns'
It’s possible as well to launch shell command using the shell or command module.
Getting file system disk space usage :
$ ansible mt-ub-repo1 -m shell -a "df -h"
mt-ub-repo1 | CHANGED | rc=0 >>
Filesystem                        Size  Used Avail Use% Mounted on
udev                              1.8G     0  1.8G   0% /dev
tmpfs                             369M   39M  331M  11% /run
/dev/mapper/vg_mtubrepo1-lv_root   16G  6.0G  8.5G  42% /
tmpfs                             1.9G  176K  1.9G   1% /dev/shm
tmpfs                             5.0M     0  5.0M   0% /run/lock
tmpfs                             1.9G     0  1.9G   0% /sys/fs/cgroup
/dev/sda1                         472M  184M  264M  42% /boot
/dev/sdb1                         197G  158G   40G  80% /ubuntu_repo
tmpfs                             369M   32K  369M   1% /run/user/111
tmpfs                             369M     0  369M   0% /run/user/1002
Replacing a line in a file :
⚠️ I’m using this as an example as it’s always better and recommended to use the replace or lineinfile module to make this change.
$ ansible mt-ub-postfix -m shell -a "sed -i 's/10.74.208.11/superproxyamazing.telco.mt/g' /etc/apt/apt.conf" --become
mt-ub-postfix | CHANGED | rc=0 >>

$ ansible mt-ub-postfix -m shell -a 'cat /etc/apt/apt.conf'
mt-ub-postfix | CHANGED | rc=0 >>

Acquire::http::proxy  "http://superproxyamazing.telco.mt:8080";
You can use the service module to start,stop, reload or install any services.
$ ansible mt-ub-postfix -m service -a 'name=postfix state=stopped' --become
mt-ub-postfix | CHANGED => {
    "ansible_facts": {
        "discovered_interpreter_python": "/usr/bin/python"
    },
    "changed": true,
    "name": "postfix",
    "state": "stopped",
    },
ansibleadmin@mt-ub-terform:~$ ansible mt-ub-postfix -m service -a 'name=postfix state=started' --become
mt-ub-postfix | CHANGED => {
    "ansible_facts": {
        "discovered_interpreter_python": "/usr/bin/python"
    },
    "changed": true,
    "name": "postfix",
    "state": "started",
You will use the user module if you want to create/remove user and add him to different group.
Let’s create a user backupadmin and add the user on the group sudo ( let’s assumed sudo is installed and it’s an debian based machine).
$ ansible mt-ub-postfix -m user -a "name=backupadmin shell=/bin/bash groups=sudo" --become
mt-ub-postfix | CHANGED => {
    "ansible_facts": {
        "discovered_interpreter_python": "/usr/bin/python"
    },
    "changed": true,
    "comment": "",
    "create_home": true,
    "group": 1007,
    "groups": "sudo",
    "home": "/home/backupadmin",
    "name": "backupadmin",
    "shell": "/bin/bash",
    "state": "present",
    "system": false,
    "uid": 1006
}

# remove the user
$ ansible mt-ub-postfix -m user -a "name=backupadmin state=absent remove=yes" --become
And, that’s it for today ! ❤️ Ansible

Until the next episode explaining the playbook…