Code, Init, Plan, Apply with Terraform
This first article about Terraform will explain you the concept of Infrastructure as Code or IAC and how to first configure and use Terraform to provision virtual machine or instance and especially a web server on Amazon Web Service and all that, for free using the free-tier on AWS.
Infrastructure as Code ?
A long time ago but not so far away, SysAdmin or “Ops” teams were used to deploy virtual machines or servers manually for the “Dev” who were coding and developing the application.
This process was taking time and it was usually boring and repetitive job and costly in term of time and hardware to buy and manage.
Nowadays, most companies are moving their infrastructure to the Cloud, using AWS, Azure and Google Cloud Platform.
Cloud ecosystems provide hardware and “Ops” can now focus on Operation and Software.
“Dev” and “Ops” work now closely together to become Devops, transforming the complexities of IT infrastructure management into code that manages the entire IT infrastructure with little maintenance.
The idea of Infrastructure of code is that you write and execute code and magic happens.
Merlin the devops
You can easily provision virtual hardware and configure software using IAC.
With Terraform by example, you will write code to define, update, deploy and destroy your new infrastructure, it can be in the cloud or even in your virtualization infrastructure like Vmware.
A big advantage of Infrastructure as Code is that it will simplify your life, you will be able to deploy faster, make update of Infrastructure very fast and even recover from failure with few command or automatically.
Moreover, Iac is self documenting and you can understand easily what the code is doing and you will be able to store your IAC source file in Version Control like Git to keep a track of your infrastructure version, to share easily and collaborate with your team.

Finally, to manually deploy infrastructure is boring and repetitive tasks and prone to manual error, managing the provisioning of your infrastructure with IAC will make your workflow faster and more resilient and it will bring you happiness and time. 😇
Lost Time is never found again.
Benjamin Franklin
Why using Terraform ?

In my opinion, Terraform is the holy grail for IAC as a provisioning tools and here are few reasons :
-
Open-source.
-
Written in Go so it’s very fast and efficient.
-
It has a really big community and it’s growing every day.
-
It supports multiple providers, Cloud but not only, you can provision Virtual Machine on Vmware or resources on Kubernetes, Database, GitHub … It’s not platform agnostic like few of his concurrent like AWS Cloudformation. Have a look on the huge list of providers that Terraform support : Terraform registry
-
It’s a declarative language: you write code that specifies the desired end state and Terraform will figure out for you how to create it. Because it’s declarative, reading your file, you can always know the current setup and you use git power or diff to see the previous state/change.
-
Agentless or Client-Only architecture: you don’t need to install any extra agent. You connect directly on the Cloud using the cloud provider’s API and your credentials.
-
Immutable infrastructure: which means that with each change to the infrastructure, the current configuration is replaced with a new one that accounts for the change, and the infrastructure is re-provisioned. Previous configurations can be retained as versions to enable rollbacks if necessary or desired. The downside is that all infrastructure provisioned with Terraform has to be maintained and updated from Terraform and manual change are not permit anymore.
-
Use of HCL (Hashicorp Configuration Language ) syntax which is close to Yaml and easy to use and it supports Json syntax.
Terraform is the holy grail for Instracture As Code
Me

Long Story short, Terraform is from my standpoint the best tools for provisioning and managing your Infrastructure. It’s not the best as a configuration management but you can easily couple Terraform with Config Management tools like Ansible, Puppet or Chef.
How to install Terraform CLI ?
On this article, I will only focus on Terraform CLI which is the free version of Terraform and on the installation on MacOs but you can follow this documentation follow your OS.
For MacOs, you can follow the procedure or you can use the package manager brew to install it.
brew install terraform
Check if it’s correctly installed and the version of Terraform
> terraform -version
Terraform v0.14.6
Create Amazon Web Service Account and new IAM User to use Terraform on AWS
In this example, we will deploy an instance on Amazon Web service using the generous free-tier provided.
If you don’t have already an AWS account, it’s the good time to do it ! AWS Account Creation
The first time you will connect to the console, you will use the ‘root’ user, this account have access to do anything and it’s not recommended to use it except for billing purpose or managing users and I will suggest to activate Multi-factor Authentication (MFA) for this user.
We will created a new more-limited user account using the Identity and Access Management or AMI service.
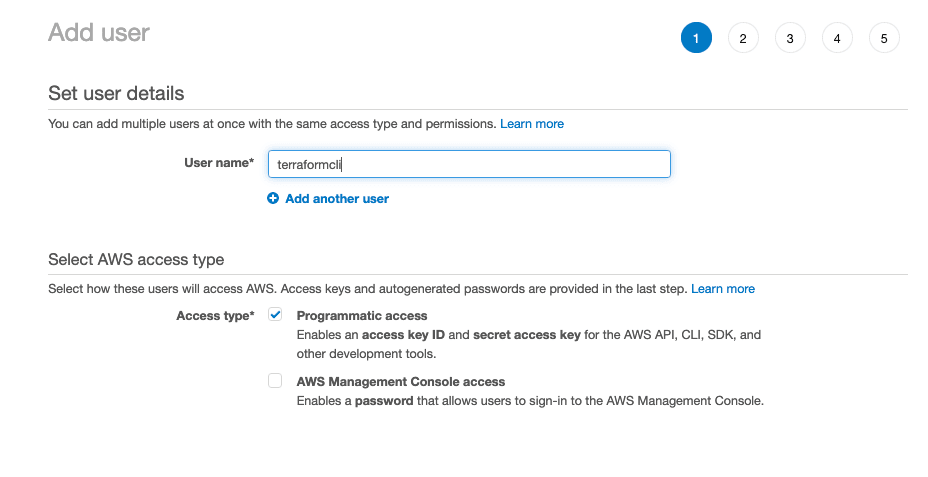
From the AWS Console, go to IAM, click Users and Create New Users.

As you can see, select only “programmatic access”, this user will be use only from CLI or Terraform and you will not be able to connect on the web console.
You can use the root account to connect to the console from now or even better, create already a new user with “AWS Management Console access” only, activate MFA and give him ‘AdministratorAccess’.
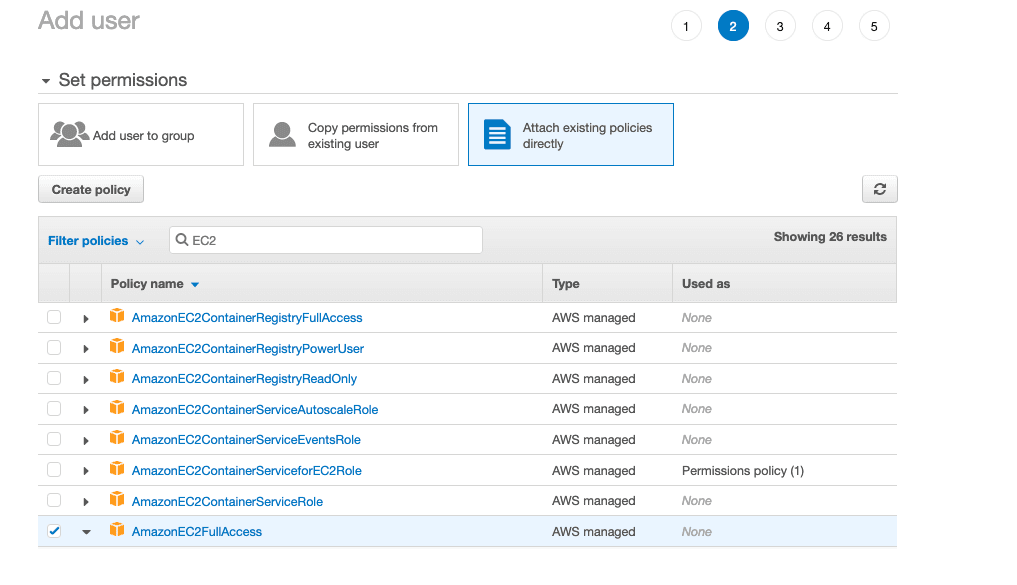
Next, you will need to give the user the least right permission as by default, user is created with no permission.
The best is to use group to manage policy, you can make a new group or you can attach directly policies to the user.
We will attach directly the policy ‘AmazonEC2FullAccess’ to be able to Create/Update/Destroy EC2 instances or AWS Virtual Machine Only.
💡 You will not be able to do anything more than managing instance with that policy but you can attach policy later on this account.

Then, click the Create Button, AWS will show you the security credentials for that new user, which consists of an Access key ID and a secret Key ID, save that safely and these are the credentials to connect to AWS programmatically (CLI, SDK or Terraform).
All right, let’s prepare our computer to connect to AWS from Terraform.
If you are on Linux/Unix/MacOs, you can use the environment variable as below :
export AWS_ACCESS_KEY_ID=(your access key id of your programmatic user)
export AWS_SECRET_ACCESS_KEY=(your secret key id of your programmatic user)
These environment variable will only apply to your current shell and you will lose it if you close your terminal or reboot your computer.
To make it permanent, you can install the AWS CLI AWS Cli installation and configure it to be able to use your new fresh user using the command ‘aws configure’ from your terminal AWS Cli Configure
aws configure
AWS Access Key ID [None]: AKIAIOSFODNN7EXAMPLE
AWS Secret Access Key [None]: wJalrXUtnFEMI/K7MDENG/bPxRfiCYEXAMPLEKEY
Default region name [None]: eu-west-1
Default output format [None]: json
💡 For the region, use the region closest to your position. You can see the different naming for the region from the top right corner of the console.
An AWS Region is a separate geographic area and in each region there are multiple isolated Datacenter known as AZ or Availability Zone.
Perfect, now that we configured everything, let’s try that AWS Cli is working well.
aws ec2 describe-instances
{
    "Reservations": []
}
(END)
Looks great! we are ready to go and to use terraform now.

Deploy a single server on AWS with Terraform
First, create a new directory for your test as below :
mkdir -p terraform/test ; cd terraform/test
Then, you will create a main file which will define the provider you will use using your favorite editor. I recommended Vim or Visual Studio Code. You can named it whatever you want but the file need the extension .tf. The common naming is to name it ‘main.tf’ .
vim main.tf
provider "aws" {
  region = "eu-west-2"
}
This file will inform Terraform which Provider you want to use and Terraform will download and install the code for this provider when you will use the terraform init command.
> terraform init

Initializing the backend...

Initializing provider plugins...
- Finding latest version of hashicorp/aws...
- Installing hashicorp/aws v3.27.0...
The provider’s code will be store in a new directory .terraform
> cd .terraform
> tree
.
└── providers
└── registry.terraform.io
└── hashicorp
└── aws
└── 3.27.0
└── darwin_amd64
└── terraform-provider-aws_v3.27.0_x5
With each provider, you are able to create a lot of different resource like instance, load balancer, DB, …
The syntax is a below :
resource "<Provider>_<Type>" "Name" {
    [CONFIG/Parameter]
}
Type will be the type of resource you want like instance, db, …
Name is an identifier that you are free to name.
CONFIG is list of one or more argument different follow the type of resource you want. You can have an overview of all the config/input parameter on this url :
aws ec2 instance config terraform documentation
Great, now you can make a new file on the main directory you create previously or you can write directly on the main.tf.
💡 There is a lot of different approach concerning the organization of your file for Terraform but in my opinion, to write everything on the main.tf will be hard to maintain and manage once your configuration is growing.

Following that, let’s create a new file named 1_ec2.tf
resource "aws_instance" "webserver" {
   ami = "ami-098828924dc89ea4a"
   instance_type = "t2.micro"
   tag = {
       Name = "amazingwebserver"
   }
}
⚠️ The AMI ID will be different follow the region you have chosen as AMI is region specific.
This AMI ID is for Amazon Linux 2 in region eu-west-2 and it’s free tier using t2.micro type.
By the way, don’t change the instance_type if you don’t want to pay extra $.
Cool, we are ready to go !
You can use the command terraform plan to make sanity check or dry-run for your code, it will show you what terraform will do before making any changes.

> terraform plan

An execution plan has been generated and is shown below.
Resource actions are indicated with the following symbols:
  + create

Terraform will perform the following actions:

  # aws_instance.webserver will be created
  + resource "aws_instance" "webserver" {
      + arn                          = (known after apply)
      + associate_public_ip_address  = (known after apply)
      + availability_zone            = (known after apply)
      + cpu_core_count               = (known after apply)
      + cpu_threads_per_core         = (known after apply)
      + get_password_data            = false
      + host_id                      = (known after apply)
      + id                           = (known after apply)
      + instance_state               = (known after apply)
      + instance_type                = "t2.micro"
      .....

Plan: 1 to add, 0 to change, 0 to destroy.
The output of the command is like the output of the diff command on Linux or git :
| sign | description |
|---|---|
| + | Plus will be anything created |
| - | Minus will be anything deleted |
| ~ | Tilde will be anything modified |
Once dry run and valid, you can use the terraform apply command to deploy your first ec2 instance. The output will be similar of the previous command and you will need to confirm.
terraform apply
...
Plan: 1 to add, 0 to change, 0 to destroy.

Do you want to perform these actions?
  Terraform will perform the actions described above.
  Only 'yes' will be accepted to approve.

  Enter a value: yes

aws_instance.webserver: Creating...
aws_instance.webserver: Still creating... [10s elapsed]
aws_instance.webserver: Still creating... [20s elapsed]
aws_instance.webserver: Creation complete after 24s [id=i-047b9be990dcc3028]

Apply complete! Resources: 1 added, 0 changed, 0 destroyed.
Nice ! Your server was deployed in 24s and one command.
Maybe, you are asking yourself, what will happens if I do the command again ?
> terraform apply
aws_instance.webserver: Refreshing state... [id=i-047b9be990dcc3028]

Apply complete! Resources: 0 added, 0 changed, 0 destroyed.
Terraform will do nothing as it’s a declarative language and then Terraform knows that the EC2 instance already exists. Good boy ! 😇
You can connect now on your aws console on the EC2 section -> instances to verify that your server is running. ( Don’t forget to select the right region from the top right corner).

Perfect but we don’t have a Web Server, it’s just a fresh Linux Machine from now and we are not able to connect. Let’s continue.
Create a web server on our EC2 instance
With AWS EC2, you can define user-data to launch a script during the first time the instance will launch, during the creation of the instance.
We will change our 1_ec2.tf file as below :
resource "aws_instance" "webserver" {
   ami = "ami-098828924dc89ea4a"
   instance_type = "t2.micro"
   tags = {
       Name = "amazingwebserver"
       Env = "test"
   }
   user_data = <<EOF
        #! /bin/bash
        sudo yum update -y
        sudo yum install -y httpd.x86_64
        sudo systemctl enable httpd
        sudo systemctl start httpd
        echo "<h1>My amazing web server</h1>" | sudo tee /var/www/html/index.html
EOF

}

output "instance_ips" {
  value = aws_instance.webserver.*.public_ip
}
output "instance_dns" {
  value = aws_instance.webserver.*.public_dns
}
Terraform is using EOF for multi-line string parameter.
Basically, the code is installing apache httpd as a web server and start the service.
You can see that I add an output section to get the public IP and the public DNS of the new instance.
🤔 On Production Environment, it will be recommended and cleaner to use variable for the name of the server and to have all outputs on a different file to be able to reuse the code later for other environment.
When you will launch the terraform plan, it will tell you that it will destroy the ec2 instance and create a new one but why !?
It will do as the user data is a script launch during the creation of the ec2.
It’s something really important to understand, few parameters will destroy the resource and make a new one, e.g. changing instance_type.
terraform plan
...
Plan: 1 to add, 0 to change, 1 to destroy.
Making the change :
terraform apply
aws_instance.webserver: Destroying... [id=i-047b9be990dcc3028]
aws_instance.webserver: Still destroying... [id=i-047b9be990dcc3028, 10s elapsed]
aws_instance.webserver: Still destroying... [id=i-047b9be990dcc3028, 20s elapsed]
aws_instance.webserver: Still destroying... [id=i-047b9be990dcc3028, 30s elapsed]
aws_instance.webserver: Still destroying... [id=i-047b9be990dcc3028, 40s elapsed]
aws_instance.webserver: Still destroying... [id=i-047b9be990dcc3028, 50s elapsed]
aws_instance.webserver: Destruction complete after 52s
aws_instance.webserver: Creating...
aws_instance.webserver: Still creating... [10s elapsed]
aws_instance.webserver: Still creating... [20s elapsed]
aws_instance.webserver: Still creating... [30s elapsed]
aws_instance.webserver: Creation complete after 34s [id=i-048ba63c657c2ba3e]

Apply complete! Resources: 1 added, 0 changed, 1 destroyed.
When you created your EC2 instance, Terraform was using the default security group which is blocking all inbound connection to your instance.
All inbound and outbound access for EC2 instances are defined on security groups.
We will need now to create a new security group allowing inbound access on port 80 (http) and outbound on all port to our server and attach to our server.
For that, let’s create a new file 0_securitygroup.tf as below :
vim securitygroup.tf

resource "aws_security_group" "securitygroupweb" {
    name = "Security-group-http-only"
    description = "Allow only http access"
    ingress {
        from_port = 80
        to_port = 80
        protocol = "tcp"
        cidr_blocks = ["0.0.0.0/0"]
    }
    egress {
    from_port   = 0
    to_port     = 0
    protocol    = "-1"
    cidr_blocks = ["0.0.0.0/0"]
  }
}
This security group will allow inbound access on port 80 from any IP address. If you want to allow only your public ipv4 address, you can change as below :
vim 0_securitygroup.tf

resource "aws_security_group" "securitygroupweb" {
    name = "Security-group-http-only"
    description = "Allow only http access"
    ingress {
        from_port = 80
        to_port = 80
        protocol = "tcp"
        cidr_blocks = ["5.170.224.100/32"]
    }
    egress {
    from_port   = 0
    to_port     = 0
    protocol    = "-1"
    cidr_blocks = ["0.0.0.0/0"]
  }
}
To attach this security group on the ec2 instance, we will need to modify our 1_ec2.tf file and use reference expression, to access value from other part of our code.
The syntax is a below:
<PROVIDER>_<TYPE>.<Name of the reference><Attribute>
In our case, you can add this line in the resource section of the instance
vpc_security_groups_ids=[aws_security_group.securitygroupweb.id]
💡 You need to change the securitygroupweb word with the name of your security group.
Here is the code for the ec2 :
resource "aws_instance" "webserver" {
   ami = "ami-098828924dc89ea4a"
   vpc_security_groups_ids=[aws_security_group.securitygroupweb.id]
   instance_type = "t2.micro"
   tags = {
       Name = "amazingwebserver"
       Env = "test"
   }
   user_data = <<EOF
                #! /bin/bash
                sudo yum update -y
                sudo yum install -y httpd.x86_64
                sudo systemctl enable httpd
                sudo systemctl start httpd
                echo "<h1>My amazing web server</h1>" | sudo tee /var/www/html/index.html
EOF
}
and the code for the security groups:
resource "aws_security_group" "securitygroupweb" {
    name = "Security-group-http-only"
    description = "Allow only http access"
    ingress {
        from_port = 80
        to_port = 80
        protocol = "tcp"
        cidr_blocks = ["5.170.224.100/32"]
    }
    egress {
    from_port   = 0
    to_port     = 0
    protocol    = "-1"
    cidr_blocks = ["0.0.0.0/0"]
  }
}
It’s great but it’s not really organized, right ? What do you think ?

Let’s make the file structure better.
We will create a variable file to make our code more configurable and cleaner and use variable in our code.
You can define input variables with this syntax:
variable "Name" {
description = ""
type = ""
default = ""
}
💡 If the variable has no default, Terraform will interactively prompt you to enter a value and show you the description of the variable.
In our case, we will make few variables in a new file “variable.tf”
vim variable.tf

# Variable for EC2 instance
##########################

variable "ami_id" {
description = "id for AMI"
type = string
default = "ami-098828924dc89ea4a"
}

variable "instance_type" {
description = "type of instance"
type = string
default = "t2.micro"
}

variable "tagenv" {
description = "tag env"
type = string
default = "test"
}

variable "tagname" {
description = "name for the instance"
type = string
default = "webserver"
}

# Variable for security groups
#############################

variable "portopen" {
description = "port to open"
type = number
default = 80
}

variable "allportopen" {
description = "port to open"
type = number
default = 0
}

variable "in_cidr_block" {
  description = "CIDR block the inbound ACL"
  type        = list
  default     = ["0.0.0.0/0"]
}

variable "out_cidr_block" {
  description = "CIDR block the outbound ACL"
  type        = list
  default     = ["0.0.0.0/0"]
}
Create a new file for our user data script
vim deploywebserver.sh

#!/bin/bash
 sudo yum update -y
 sudo yum install -y httpd.x86_64
 sudo systemctl enable --now httpd
 echo "<h1>My amazing web server</h1>" | sudo tee /var/www/html/index.html
Create a output file output.tf
vim output.tf

output "instance_ips" {
  value = aws_instance.webserver.*.public_ip
}
We will change accordingly our 1_ec2.tf and 0_securitygroup.tf file to use variable
vim 1_ec2.tf
resource "aws_instance" "webserver" {
  ami                    = var.ami_id
  instance_type          = var.instance_type
  vpc_security_group_ids = [aws_security_group.securitygroupweb.id]
  tags = {
    Name = var.tagname
    env = var.tagenv
  }
  user_data = file("deploywebserver.sh")
}
And finally 0_securitygroup.tf
vim 0_securitygroup.tf
resource "aws_security_group" "securitygroupweb" {
    name = "Security-group-http-only"
    description = "Allow only http access"
    ingress {
      from_port = var.portopen
      to_port = var.portopen
      protocol = "tcp"
      cidr_blocks = var.in_cidr_block
    }
    egress {
    from_port   = var.allportopen
    to_port     = var.allportopen
    protocol    = "-1"
    cidr_blocks = var.out_cidr_block
  }
}
Here is our new file structure :
- main.tf - contains provider information
- variables.tf - contains declarations of variables
- 1_ec2.tf for ec2 resource deployment
- 0_securitygroup.tf for the security group resource deployment
- outputs.tf - contains outputs from the resources
- deploywebserver.sh - contains the BASH user data script to create and start the web server
And voilà, ready to go ! Let’s plan and apply to test our code.
> terraform plan
aws_instance.webserver: Refreshing state... [id=i-048ba63c657c2ba3e]

An execution plan has been generated and is shown below.
Resource actions are indicated with the following symbols:
  + create
  ~ update in-place
Terraform will perform the following actions:

  # aws_instance.webserver will be updated in-place
  ~ resource "aws_instance" "webserver" {
        id                           = "i-048ba63c657c2ba3e"
        tags                         = {
            "Name" = "amazingwebserver"
        }
      ~ vpc_security_group_ids       = [
          - "sg-48e02a30",
        ] -> (known after apply)
        # (26 unchanged attributes hidden)
        # (4 unchanged blocks hidden)
    }
Plan: 1 to add, 1 to change, 0 to destroy.
As you can see, Terraform will create a new resource ‘security group’ and will change our ec2 instance but will not destroy it this time.
When we will apply, it will return the public IP of our instance to be able to connect from our browser to test our web server.
terraform apply

aws_security_group.securitygroupweb: Creating...
aws_security_group.securitygroupweb: Creation complete after 4s [id=sg-0746c1244bae9b412]
aws_instance.webserver: Modifying... [id=i-048ba63c657c2ba3e]
aws_instance.webserver: Modifications complete after 6s [id=i-048ba63c657c2ba3e]

Apply complete! Resources: 1 added, 1 changed, 0 destroyed.

Outputs:

instance_ips = [
  "52.56.56.165",
]
As you can see, Terraform is giving as output the public IP of the instance.
If you want to get the output later on, you can use this terraform command:
terraform output
You can check that your http server is working using the public ip address from the CLI or from your browser.
> curl http://52.56.56.165
<h1>My amazing web server</h1>
>
Or via your browser :

Awesome, we’ve created our first web server from Terraform.
Now, we can easily destroy/delete everything with only one command:
terraform destroy

This is the beauty of Infrastructure as Code and especially Terraform, once everything is settled and organized it’s very fast and you can use your code for multiple environnement and automate the deployment with your CD pipeline like GitLab.
The output of this command will show you all the resources that Terraform will delete before prompting to confirm.
terraform destroy
...
Plan: 0 to add, 0 to change, 2 to destroy.
I hope this article gave you a nice overview of the power of Terraform and give you the desire to start and manage your Infrastructure on Cloud with it. Don’t forget to use version control like Git with your code 😆.
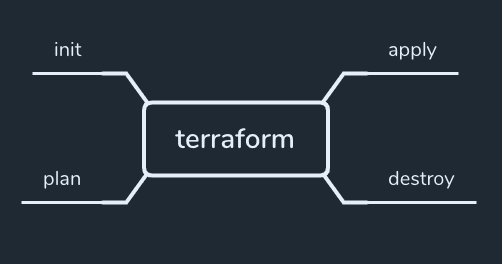
And remember from now these basic commands:

Stay tuned for upcoming blogs about Devops.