Installation of Infrastructure for AI Project
This article is part of a biggest project that will experiment AI on local Kubernetes Cluster. The project is to be able to train a model on Kubernetes from Dataset that we will create and to expost an API to use this model
K3S, what is it ?
K3S is a very lightweight kubernetes cluster that is light than minkikube and that will be perfect for this project
![]()
Before installing, K3S you need to install docker desktop and brew but this article will not cover this part
brew install k3d kubectl
Now that your cluster is installed, let’s run it ! Adjust following your need and the spec of your mac.
k3d cluster create ai-books \
  --servers 1 \
  --agents 1 \
  -p "8080:80@loadbalancer" \
  -p "8443:443@loadbalancer" \
  --api-port 6550 \
  --servers-memory 10g
Now, you can verify that your K8S cluster is running
kubectl get nodes
k get pods -A
Package Manager for Kubernetes, Helm ? Helmfile ?
To deploy the apps we need, we will use helm which is a package/chars manager for Kubernetes. A Helm Chart is like a software package or app bundle but for Kubernetes. It will contain all the files Kubernetes needs to install and configure an application. Helm is the package manager that installs, updates, and manages charts.
A typical chart looks like this:
my-chart/
├─ Chart.yaml          # Metadata about the chart (name, version, description)
├─ values.yaml         # Default configuration values
├─ templates/          # Kubernetes manifests templates
│   ├─ deployment.yaml
│   ├─ service.yaml
│   └─ configmap.yaml
└─ charts/             # Optional: dependencies on other charts
How Helm chart and helm are working together ?
You have a chart (like argo-cd or mlflow)
You use Helm to install it:
helm install my-argocd argo/argo-cd --namespace argocd
Helm reads the chart, combines templates + values, and creates the actual Kubernetes resources:
Pods
Services
ConfigMaps
Deployments, etc.
Later, you can upgrade or rollback the chart easily:
helm upgrade my-argocd argo/argo-cd -f custom-values.yaml
helm rollback my-argocd 1
You can check the status with this command
helm list -A
helm status argocd -n argocd
Why Helm charts are useful ?
- Reusable: install the same app multiple times with different configs
- Versioned: charts have versions, so upgrades are safe
- Declarative: all config in YAML → compatible with GitOps
- Dependency management: one chart can include others
- A lot of Helm charts are already created and managed by other companies and you can use them easily
You don’t need to write all the Kubernetes YAML yourself, the chart contains templates ready to install.
How to deploy Helm chart ?
You can use helm command directly to deploy helmchart, helmfile if you want to deploy multi helmchart or Terraform or any IAC tools.
In my case, I will use Terraform as It’s been years I’m working with this tools and I love it.
Installation of ArgoCD with Terraform
Using Terraform, you will need to use the provider ‘helm’ to be able to work with Helm chart, so first you will configure the provider.
You will create this directory structure
├── main.tf
├── provider.tf
└── values
    └── dev
        └── argocd.yaml
The provider.tf will be the configuration of helm, basically how Terraform will be able to access your Kubernetes Cluster
As we are using a local kubernetes cluster, it’s easy, terraform will use our local kubeconfig
vim provider.tf
provider "helm" {
    kubernetes = {
        config_path = "~/.kube/config"
    }
}
Then we will declare what kind of resource we want to create using this provider, in our case we will want to deploy an helm chart
vim main.tf
resource "helm_release" "argocd" {
  name = "argocd"

  repository       = "https://argoproj.github.io/argo-helm"
  chart            = "argo-cd"
  namespace        = "argocd"
  create_namespace = true
  version          = "3.35.4"

  values = [file("values/dev/argocd.yaml")]
}
Then you will need to forward the server to your machine to access, if you want to know which command to do you can always use the helm status command
 helm list -A
argocd          argocd          1               2025-10-21 15:55:33.966658 +0200 CEST   deployed        argo-cd-3.35.4                  v2.2.5

jusi@Juliens-MacBook-Air argo-applications % helm status argocd -n argocd
NAME: argocd
LAST DEPLOYED: Tue Oct 21 15:55:33 2025
NAMESPACE: argocd
STATUS: deployed
REVISION: 1
TEST SUITE: None
NOTES:
In order to access the server UI you have the following options:

1. kubectl port-forward service/argocd-server -n argocd 8080:443

    and then open the browser on http://localhost:8080 and accept the certificate

2. enable ingress in the values file `server.ingress.enabled` and either
      - Add the annotation for ssl passthrough: https://github.com/argoproj/argo-cd/blob/master/docs/operator-manual/ingress.md#option-1-ssl-passthrough
      - Add the `--insecure` flag to `server.extraArgs` in the values file and terminate SSL at your ingress: https://github.com/argoproj/argo-cd/blob/master/docs/operator-manual/ingress.md#option-2-multiple-ingress-objects-and-hosts


After reaching the UI the first time you can login with username: admin and the random password generated during the installation. You can find the password by running:

kubectl -n argocd get secret argocd-initial-admin-secret -o jsonpath="{.data.password}" | base64 -d

(You should delete the initial secret afterwards as suggested by the Getting Started Guide: https://github.com/argoproj/argo-cd/blob/master/docs/getting_started.md#4-login-using-the-cli)
As you can see, you have the command to forward the port and to get the secret for connect on the interface.
kubectl port-forward service/argocd-server -n argocd 8080:443
You can then access from argocd
Now that argocd is deployed, we will create application on ArgoCD.
What is an application in ArgoCD ?
In simple words, an Application in Argo CD is like a blueprint or recipe that tells Argo CD:
“Here’s what I want to deploy, and here’s where it should go.”
Let’s break that down:
🗂️ It defines what to deploy: The Application points to your app’s source — usually a Git repository with Kubernetes YAML or Helm charts.
🌍 It defines where to deploy: It tells Argo CD which cluster and which namespace to deploy it to.
🔄 It keeps things in sync: Argo CD constantly checks that what’s running in your cluster matches what’s in Git. If something drifts, it can alert you or automatically fix it.
Example
Here’s a super simple example of an Argo CD Application:
apiVersion: argoproj.io/v1alpha1
kind: Application
metadata:
  name: my-app
spec:
  source:
    repoURL: https://github.com/user/my-app.git
    path: k8s
    targetRevision: main
  destination:
    server: https://kubernetes.default.svc
    namespace: my-namespace
  syncPolicy:
    automated: {}
This says:
“Deploy what’s in the k8s/ folder of that Git repo,” “to the my-namespace namespace in this cluster,” “and automatically keep it up to date.”
An Argo CD Application is a configuration object that tells Argo CD what to deploy, from where, to where, and how to keep it synced.
We will create an application for Minio.
What is miniO and why to use it and how we will deploy it using Helm and Argocd ?
MinIO is a storage system for files and data, kind of like your own private Google Drive or Amazon S3. It stores data as objects (files, PDFs, images, datasets, etc.) in something called buckets — similar to folders.
And you can use the aws CLI and boto3 command to manage your bucket like you will be on S3, basically it’s like having S3 but locally and then it’s easy after to move to AWS once the project is in production phase.
Another possibility was to use LocalStack that is like having AWS on your laptop but we will use MiniO as it’s faster and better for AI purpose and can be use on production, which is not the case of Localstack.
We will in our case use Minio as standalone with only 1 replicas as we are using local Kubernetes cluster but by default MiniO normally is deploying 4 pods on 4 nodes so it’s HA and full redundant as S3, all depend of course how you will design that.
I will have a new repo that will include all my manifests or Helm chart and configuration that will be sync by argocd, using an application.
Let’s create first, the Helm Chart and configuration.
Here is the structure of directories, it’s important for the next step for the argocd application
jusi@Juliens-MacBook-Air argocd-manifest % tree
.
└── K8S
    ├── AI
    │   ├── ai-deploy-dataset.yaml
    │   ├── minio
    │   │   └── helm
    │   │       ├── Chart.yaml
    │   │       └── values.yaml
Chart.yaml — Defines what your Helm chart is and its dependencies
apiVersion: v2
name: minio
description: MinIO deployment managed by ArgoCD
type: application
version: 0.1.0
appVersion: "1.0"
dependencies:
  - name: minio
    version: 5.0.14
    repository: https://charts.min.io/
values.yaml — Defines how your MinIO is configured
Because you use a dependency, you must nest all settings under the dependency name minio:. You define how many pods, persistence, ports, and resources you want.
minio:
  mode: standalone
  replicas: 1
  existingSecret: minio-secret
  persistence:
    enabled: true
    size: 5Gi
    storageClass: local-path
  service:
    type: NodePort
    nodePorts:
      api: 30090
      console: 30091
  buckets:
    - name: ebooks
      policy: none
      purge: false
  resources:
    requests:
      memory: 512Mi
      cpu: 250m
    limits:
      memory: 512Mi
      cpu: 500m
The secret used by Minio Chart was created before manually:
kubectl create secret generic minio-secret -n minio --from-literal=rootUser=minioadmin --from-literal=rootPassword=‘YourPasswordForMiniO’
We will not deploy the Helm manually using any helm command, we will create an ArgoCD application that will check the repository and directory for any change and will sync automatically.
Let’s create our Argocd App:
apiVersion: argoproj.io/v1alpha1
kind: Application
metadata:
  name: minio
  namespace: argocd
  finalizers:
    - resources-finalizer.argocd.argoproj.io
spec:
  project: default
  source:
    repoURL: https://github.com/archi-jusi/argocd-manifest.git
    targetRevision: main
    path: K8S/AI/minio/helm
    helm:
      releaseName: minio
      valueFiles:
        - values.yaml
  destination:
    server: https://kubernetes.default.svc
    namespace: minio
  syncPolicy:
    automated:
      prune: true
      selfHeal: true
      allowEmpty: false
    syncOptions:
      - Validate=true
      - CreateNamespace=true
      - PrunePropagationPolicy=foreground
      - PruneLast=true
This ArgoCD Application tells ArgoCD:
- where to get the chart → (repoURL, path, targetRevision)
- what to deploy → the Helm chart in K8S/AI/minio/helm
- how to deploy it → using values.yaml
- where to deploy it → into the minio namespace in your cluster
- syncPolicy → automatically apply, fix drift, and clean old resources
Now we will apply this application, later we can add an application that automatically deploy and sync all apps.
kubectl apply -f minio.yaml
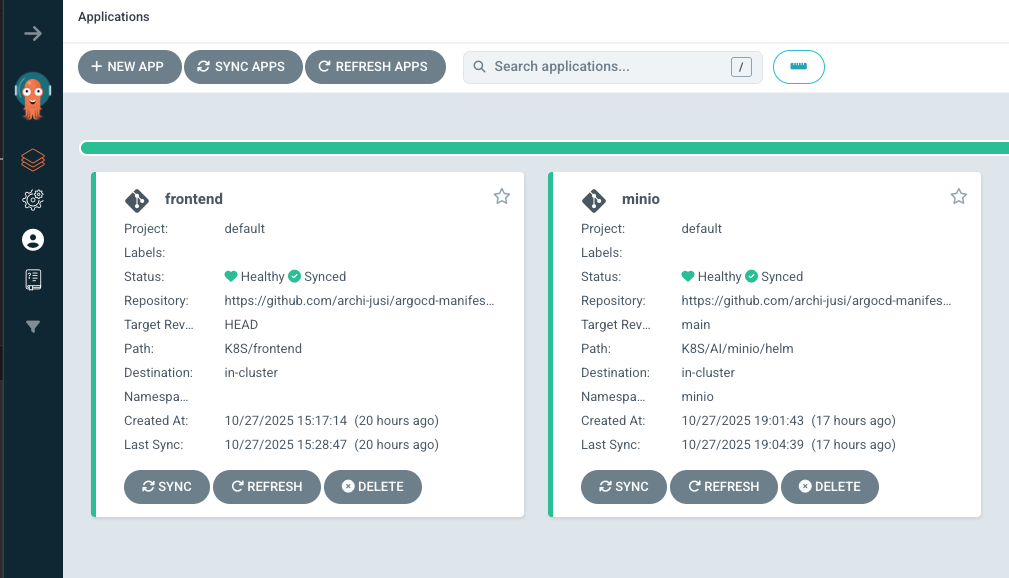
You can verify that all is working from the console or from the GUI
jusi@Juliens-MacBook-Air argocd-manifest % k get apps -A
NAMESPACE   NAME       SYNC STATUS   HEALTH STATUS
argocd      frontend   Synced        Healthy
argocd      minio      Synced        Healthy
If you have any issue, you can check the status of the apps from CLI
k get apps -A
k describe apps minio -n argocd
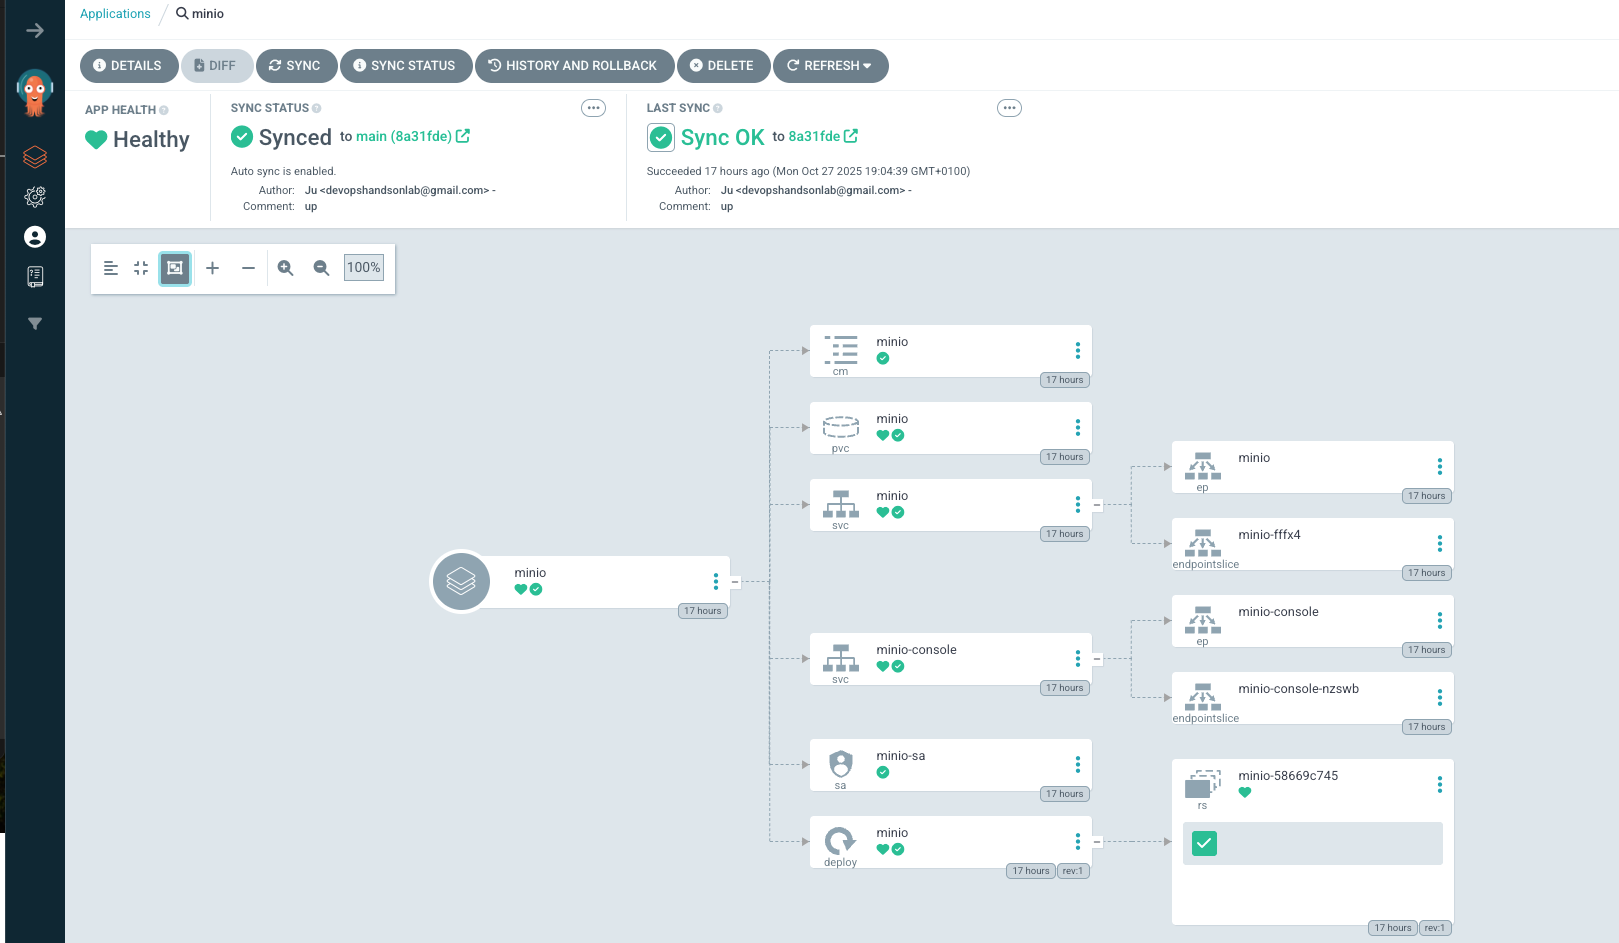
Now, you can connect on your Minio Gui after forward the port :
kubectl port-forward svc/minio-console -n minio 30091:9001
Now that Minio is up and running and have already a bucket created, I need new credentials for my apps to be able to connect on my bucket and I want a policy that allow only this user and admin to be able to use API to connect on this bucket
Let’s create a new secret that will be deployed with Argocd and will be used by our AI app to be able to read and write on this bucket
apiVersion: v1
kind: Secret
metadata:
  name: minio-app-secret
  namespace: {{ .Release.Namespace }}
  annotations:
    "helm.sh/resource-policy": keep
type: Opaque
stringData:
  accessKey: apps_user
  secretKey: {{ randAlphaNum 20 | quote }}
You just need to put in the same repo and directories where you put your helm Chart and ArgoCD will create automatically as it will sync this repo and directory on K8S. Now, we need to Update the configuration of Minio to add this secret key.
vim values.yaml

minio:
  mode: standalone
  replicas: 1
  existingSecret: minio-secret

  persistence:
    enabled: true
    size: 5Gi
    storageClass: local-path
  service:
    type: NodePort
    nodePorts:
      api: 30090
      console: 30091
  buckets:
    - name: ebooks
      policy: none
      purge: false
    - name: dataset
      policy: none
      purge: false
  resources:
    requests:
      memory: 512Mi
      cpu: 250m
    limits:
      memory: 512Mi
      cpu: 500m
Don’t forget that everything will be sync when you have push all your change in the repo.
How to connect to MiniO like on S3 bucket ?
MiniO is really working like AWS S3 Bucket, you can create how many buckets you want, put policy and give permission to user and access from service account (which consist of Access Key)
We will need to create a new user and service account with access key, to do it, instead of doing it from GUI, we will just update our helm configuration file and argoCD will automatically do the change for us
vim values.yaml
minio:
  mode: standalone
  replicas: 1
  existingSecret: minio-secret

  persistence:
    enabled: true
    size: 5Gi
    storageClass: local-path
  service:
    type: NodePort
    nodePorts:
      api: 30090
      console: 30091
  buckets:
    - name: ebooks
      policy: none
      purge: false
    - name: dataset
      policy: none
      purge: false
  resources:
    requests:
      memory: 512Mi
      cpu: 250m
    limits:
      memory: 512Mi
      cpu: 500m

  users:
    - existingSecret: minio-app-secret
      accessKey: apps-ai #externalSecret
      existingSecretKey: secretKey
      policy: readwrite
      # optional: buckets to access
      buckets:
        - ebooks
        - dataset

  svcaccts:
    - user: apps-ai
      accessKey: "ofnzeroifezrooOIOIC"
      secretKey: "IOOFEOFNCazidzec2cezOLFESZS"
      policy:
        statements:
          - resources:
              - 'arn:aws:s3:::ebooks/*'
              - 'arn:aws:s3:::dataset/*'
            actions:
              - "s3:*"
As you can see the access key is hardcode here as it’s a dev environment but it will never be like that on production environment and I gave access of all s3 action to both buckets created previously.
Once done, you will need to test. You will need to use AWS CLI and create a new profile with this access key.
brew install awscli
aws configure --profile minio
You will need to forward the port as well for the API of Minio
jusi@Juliens-MacBook-Air helm % k get svc -n minio
NAME            TYPE        CLUSTER-IP      EXTERNAL-IP   PORT(S)          AGE
minio           NodePort    10.43.237.213   <none>        9000:32000/TCP   27h
minio-console   ClusterIP   10.43.162.157   <none>        9001/TCP         27h
The application is using the port 9000 and we will forward on localhost on port 32000
kubectl port-forward svc/minio -n minio 32000:9000
Now, you can try to see if it work listing the bucket
jusi@Juliens-MacBook-Air helm % aws s3 ls --endpoint-url http://localhost:32000 --profile minio
2025-10-28 12:42:24 dataset
2025-10-27 19:04:35 ebooks
As I don’t like to make few times the same boring thing, I always try to AUTOMATE each process and Ansible is definitively the tool for that as it’s very powerful for a lot of automation workflow.
You can use it to manage Windows machines, Linux, Vmware, Hpe product, etc.
Ansible is shipped with a lot of amazing modules which has specific use from the administration of users on the system to the configuration of network devices.
Installation of Ansible on Ubuntu
You will only need to install ansible on your control nodes. In this example, we will install Ansible on Ubuntu but you can follow this documentation follow your OS Ansible Installation
$ sudo apt update
$ sudo apt install software-properties-common
$ sudo apt-add-repository --yes --update ppa:ansible/ansible
$ sudo apt install ansible
Once installed, verify :
# Get version of Ansible
ansible --version
# Get Facts of the Control Host
ansible localhost -m setup
Ansible node Inventory
Ansible is using simple INI or YAML file to organize the inventory of the nodes you will manage.
There is few different way to organize follow your needs, it can be by example by
- importance ( Test, PreProd, Prod, Lab)
- os ( Linux, Windows, …)
- purpose ( web, database, …)
You can use different inventory file and specify it when you are using ansible with the -i parameter. And you can specify the -i switch more than once time to use multiple inventories. It’s very useful in case you are using dynamic inventories as Ansible will combine Static and dynamic inventories together. This part will be explained further in other post.
INI Configuration file example
In our case, we will separate by OS Distribution.
The headings in brackets are group names, which are used in classifying hosts and deciding what hosts you are controlling at what times and for what purpose, in this case we are classifying by Linux distribution.
vim /etc/ansible/inventory/serverlinux.cfg
sudo -i
[ubuntu]
mt-ub-graf1
mt-ub-postfix
mt-ub-syslog1
mt-ub-teleg1
mt-ub-repo1

[centos]
mt-ce-medcre6
mt-ce-medcre7
mt-ce-stor2rrd

[oracle]
mt-ol-dpis
mt-ol7-repo1
mt-ol6-repo1

[repo]
mt-ub-repo1
mt-ol6-repo1
I’m not using YAML file for the Ansible inventory as I try to keep simple and as we don’t have thousand of servers, I find it more readable.
There are 2 groups by defaults :
[all] and [ungrouped]. Basically, the all is all 😄.
It contains all the hosts from each group/section.
The ungrouped will be all the hosts which are not part of any group. We don’t have any in this case.
You can have a overview/tree of your inventory with this ansible command :
$ ansible-inventory --graph -i serverlinux.cfg
@all:
  |--@centos:
  |  |--mt-ce-medcre6
  |  |--mt-ce-medcre7
  |  |--mt-ce-stor2rrd
  |  |--mt-ce7-repo1
  |--@oracle:
  |  |--mt-ol-dpis
  |  |--mt-ol6-repo1
  |  |--mt-ol7-repo1
  |--@repo:
  |  |--mt-ce7-repo1
  |  |--mt-ol6-repo1
  |  |--mt-ol7-repo1
  |  |--mt-ub-repo1
  |--@ubuntu:
  |  |--mt-ub-graf1
  |  |--mt-ub-postfix
  |  |--mt-ub-repo1
  |  |--mt-ub-syslog1
  |  |--mt-ub-teleg1
  |--@ungrouped:
You can organize each host in one or more groups, it can be very useful.
Then, you can target specific group or specific host and you can specify the inventory file that you want to used.
$ ansible repo -i inventory/serverlinux.cfg -m ping
mt-ub-repo1 | SUCCESS => {
    "ansible_facts": {
        "discovered_interpreter_python": "/usr/bin/python"
    },
    "changed": false,
    "ping": "pong"
}
As you see, I’m using specific user ‘ansibleadmin’. Let’s see how to configure ansible to be able to connect on each node without password.
if you don’t want to specify each time your inventory file, you can configure the ansible variable : ANSIBLE_INVENTORY
export ANSIBLE_INVENTORY=/etc/ansible/inventory/serverlinux.cfg
This change will not be permanent and will be remove once you close your session.
If you want to keep it permanently, you will need to change your Ansible configuration file as below:
vim /etc/ansible/ansible.cfg
inventory      = /etc/ansible/inventory/serverlinux.cfg
SSH Keys are your best friend !

As you don’t want to type your password each time you will manage the same servers, SSH key shared between your Ansible and the Servers Managed will be your best option.
SSH keys can allow you to connect to a server, or multiple servers, without having to remember or enter your password for each system.
You can use Root user but it’s not recommended, used another user and become sudo from ansible.
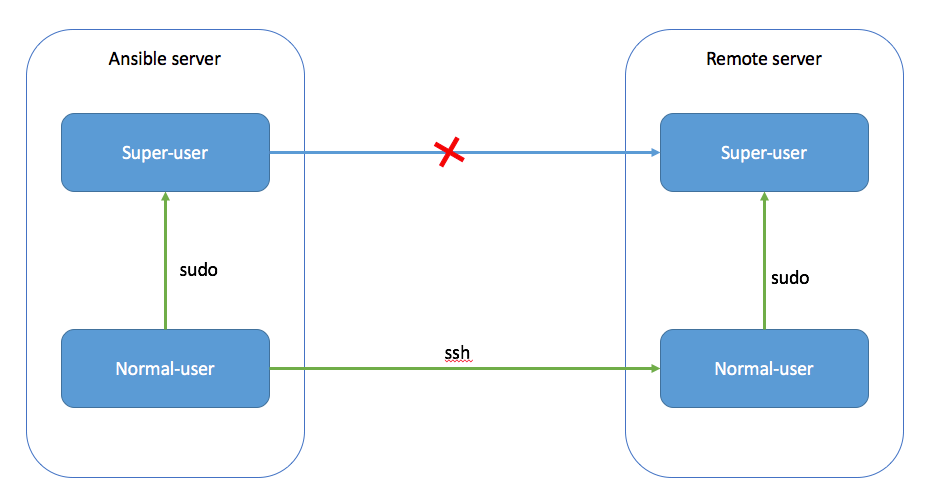
First of all, you will need to create this user on Ansible and create a new SSH key that you will share with the host that you want to manage.
Create new User on Ansible and nodes
From Ansible - Master :
if Ubuntu/Debian :
- Create the user and add the sudo permission
adduser ansibleadmin
adduser ansibleadmin sudo
If you have any error message like :
bash: sudo: command not found
You need to install sudo 😄
apt-get install sudo
- Create a new authentication ssh key for the user ansibleadmin
su - ansibleadmin
ssh-keygen -t rsa -b 4096
As you can see, i’m using rsa public key algorithms ( use by default), it’s not the best but it’s compatible with almost all old version of OpenSsh servers and it’s safe enough but it’s recommended to use 4096 bits key size ( -b 4096 ) .
If your servers have all minimum version of OpenSSH version 6.5, you can change algorithm to Ed25519, which is faster and better.
It’s the most recommended public-key algorithm available today but unhappily I have OS with old OpenSSh Version to manage for which I cannot upgrade OpenSSH. If you want to use this algorithm, use the command below ( of course change the -C parameter with your email )
ssh-keygen -a 100 -t ed25519 -f ~/.ssh/id_ed25519 -C "julien.simon@vodafone.com"
From Host you want to manage :
- Repeat the first step to create the user on the node and change sudoers file to let user to sudo without password prompting.
If Ubuntu/debian :
adduser ansibleadmin
adduser ansibleadmin sudo
vim /etc/sudoers

#Add or change this line as below :

%sudo ALL=(ALL) NOPASSWD: ALL
If Centos/Oracle Linux :
useradd ansibleadmin -G wheel
passwd ansibleadmin

vim /etc/sudoers

#Add or uncomment this line :

%wheel  ALL=(ALL)       NOPASSWD: ALL
⚠️ Once, the change done on the sudoers file, all users from group sudo or wheel will be able to sudo without password prompting. If you don’t want do it just for your user ‘ansibleadmin’ instead without the char ‘%’ as it’s for group only.
Copy the ssh key from Ansible to different nodes
Once the key is done from Ansible, you need to copy it to each node to be able to connect to them without password prompting.
From Ansible
su - ansibleadmin
ssh-copy-id servername
ex :

ssh-copy-id mt-ub-postfix
As we don’t want to do it for all the server one by one, we can automate the process using bash :
for server in $(grep -v '\[' inventory/serverlinux.cfg | sort --unique) ; do ssh-copy-id $server ;done
Once the ssh key is copied, try to connect by ssh on all servers :
for server in $(grep -v '\[' inventory/serverlinux.cfg | sort --unique) ; do timeout 5s ssh $server ; done
As you can see, i’m using the timeout command to close the SSH session after 5s and pass to the next one after.
And…That’s it for the pre configuration !

🆘 If you don’t want to use ssh key, you can use password using these parameters :
-u,--user REMOTE_USER # Connect as this user
-k,--ask-pass # ask for connection password
-b,--become # to sudo, become root
-K, --ask-become-pass # to prompt for root password

ansible groupname -m ping -u remoteuser -k -K
💡 You can define in your inventory the remote user to be used for one host or one group of host
[repo]
mt-ub-repo1
mt-ol6-repo1

[repo:vars]
ansible_user=superuser

[test]
mt-ce-test01 ansible_host=192.168.100.100 ansible_user=superman
Let’s now play with Ansible using our first ad-hoc command.
Ansible AdHoc command
If you want to do simple task on all your servers, you can use directly the Ad hoc command of Ansible with the different module provided. Ad Hoc will execute one-off commands and will not keep any record of what was done.
It’s really easy to use once you will understand the different parameter and start to know the different module. For these reasons, Ad hoc command will only be used for small changes quickly or troubleshooting fast or for learning Ansible and its modules.
For more complexes and bigger task, Ansible playbooks will be used and it will give you the possibility to reuse and organize your tasks easily. Moreover, you will keep them organized and have a copy on them and you will be able to use them again easily.
This part will be explained in the next article 😄
Let’s focus on Ad hoc Command from now, the syntax is as below :
ansible parameter1[all|ungrouped|group|hostname] (-i inventoryfile) -m moduleName -a ModuleArguments --become(to sudo) -l(limit by tag or hostname)
ex:
$ ansible repo -i serverlinux.cfg -m ping
mt-ub-repo1 | SUCCESS => {
    "ansible_facts": {
        "discovered_interpreter_python": "/usr/bin/python"
    },
    "changed": false,
    "ping": "pong"
}
mt-ol6-repo1 | SUCCESS => {
    "ansible_facts": {
        "discovered_interpreter_python": "/usr/bin/python"
    },
    "changed": false,
    "ping": "pong"
}
As my group/section on my inventory is as below :
[repo]
mt-ub-repo1
mt-ol6-repo1
You can limit to only one hostname as well using the -l parameter
$ ansible all -i serverlinux.cfg -m ping -l mt-ub-repo1
mt-ub-repo1 | SUCCESS => {
    "ansible_facts": {
        "discovered_interpreter_python": "/usr/bin/python"
    },
    "changed": false,
    "ping": "pong"
}
Ansible has a lot of Ad hoc commands useful :
You can get the fact of the host like the distribution, the ip address, dns, etc with the module gather_fact or setup and you can filter follow what you want.
$ ansible mt-ce-medcre7 -m gather_facts -a 'filter=ansible_all_ipv4_addresses'
mt-ce-medcre7 | SUCCESS => {
    "ansible_facts": {
        "ansible_all_ipv4_addresses": [
            "192.168.120.107",
            "192.168.122.1"
        ],
        "discovered_interpreter_python": "/usr/bin/python"
    },
    "changed": false,
    "deprecations": [],
    "warnings": []
}
You can get a lot of information about your servers you are managing and it can save you a lot of time.
$ ansible repo -m setup -a 'filter=ansible_distribution'
$ ansible repo -m setup -a 'filter=ansible_dns'
It’s possible as well to launch shell command using the shell or command module.
Getting file system disk space usage :
$ ansible mt-ub-repo1 -m shell -a "df -h"
mt-ub-repo1 | CHANGED | rc=0 >>
Filesystem                        Size  Used Avail Use% Mounted on
udev                              1.8G     0  1.8G   0% /dev
tmpfs                             369M   39M  331M  11% /run
/dev/mapper/vg_mtubrepo1-lv_root   16G  6.0G  8.5G  42% /
tmpfs                             1.9G  176K  1.9G   1% /dev/shm
tmpfs                             5.0M     0  5.0M   0% /run/lock
tmpfs                             1.9G     0  1.9G   0% /sys/fs/cgroup
/dev/sda1                         472M  184M  264M  42% /boot
/dev/sdb1                         197G  158G   40G  80% /ubuntu_repo
tmpfs                             369M   32K  369M   1% /run/user/111
tmpfs                             369M     0  369M   0% /run/user/1002
Replacing a line in a file :
⚠️ I’m using this as an example as it’s always better and recommended to use the replace or lineinfile module to make this change.
$ ansible mt-ub-postfix -m shell -a "sed -i 's/10.74.208.11/superproxyamazing.telco.mt/g' /etc/apt/apt.conf" --become
mt-ub-postfix | CHANGED | rc=0 >>

$ ansible mt-ub-postfix -m shell -a 'cat /etc/apt/apt.conf'
mt-ub-postfix | CHANGED | rc=0 >>

Acquire::http::proxy  "http://superproxyamazing.telco.mt:8080";
You can use the service module to start,stop, reload or install any services.
$ ansible mt-ub-postfix -m service -a 'name=postfix state=stopped' --become
mt-ub-postfix | CHANGED => {
    "ansible_facts": {
        "discovered_interpreter_python": "/usr/bin/python"
    },
    "changed": true,
    "name": "postfix",
    "state": "stopped",
    },
ansibleadmin@mt-ub-terform:~$ ansible mt-ub-postfix -m service -a 'name=postfix state=started' --become
mt-ub-postfix | CHANGED => {
    "ansible_facts": {
        "discovered_interpreter_python": "/usr/bin/python"
    },
    "changed": true,
    "name": "postfix",
    "state": "started",
You will use the user module if you want to create/remove user and add him to different group.
Let’s create a user backupadmin and add the user on the group sudo ( let’s assumed sudo is installed and it’s an debian based machine).
$ ansible mt-ub-postfix -m user -a "name=backupadmin shell=/bin/bash groups=sudo" --become
mt-ub-postfix | CHANGED => {
    "ansible_facts": {
        "discovered_interpreter_python": "/usr/bin/python"
    },
    "changed": true,
    "comment": "",
    "create_home": true,
    "group": 1007,
    "groups": "sudo",
    "home": "/home/backupadmin",
    "name": "backupadmin",
    "shell": "/bin/bash",
    "state": "present",
    "system": false,
    "uid": 1006
}

# remove the user
$ ansible mt-ub-postfix -m user -a "name=backupadmin state=absent remove=yes" --become
And, that’s it for today ! ❤️ Ansible

Until the next episode explaining the playbook…